
One of the big challenges a data scientist faces is the amount of data that is not in convenient formats. One such format are REST APIs. In large enterprises, these are especially problematic for several reasons. Often a considerable amount of reference data is only accessible via REST API which means that to access this data, users are required to learn enough Python or R to access this data. But what if you don’t want to code?
The typical way I’ve seen this dealt with is to create a duplicate of the reference data in an analytic system such as Splunk or Elasticsearch. The problems with this approach are manifold. First, there is the engineering effort (which costs time and money) to set up the data flow. On top of that, you now have the duplicate cost of storage and now you are maintaining multiple versions of the same information.
Another way I’ve seen is for each API owner to provide a graphical interface for their API, which is good, but the issue there is that now the data is stove-piped and can’t be joined with other data, which defeats its purpose altogether. There has to be a better way…
Take a look at the video tutorial below to see a demo!
The Easier Way
What if you could just query data from APIs without having to pull it, write code or do anything really? Well it turns out with the latest version of Apache Drill, you can do exactly that! Drill now enables you to query REST APIs as if they were local database tables.
How do you do it?
The first thing you need to do is get a little information about the API you are looking to query. Specifically, you’ll need to know:
- The URL Path to the data, as well as any other arguments that need to get passed to the API
- How the API handles authentication
- Any connection information such as proxies
Once you have this information, you can configure Drill to connect to your API.
Creating the Connection
First, you’ll need to create a new Storage Plugin to connect to the API. Click on Storage at the top of the screen and then click on the Create button in the upper left.
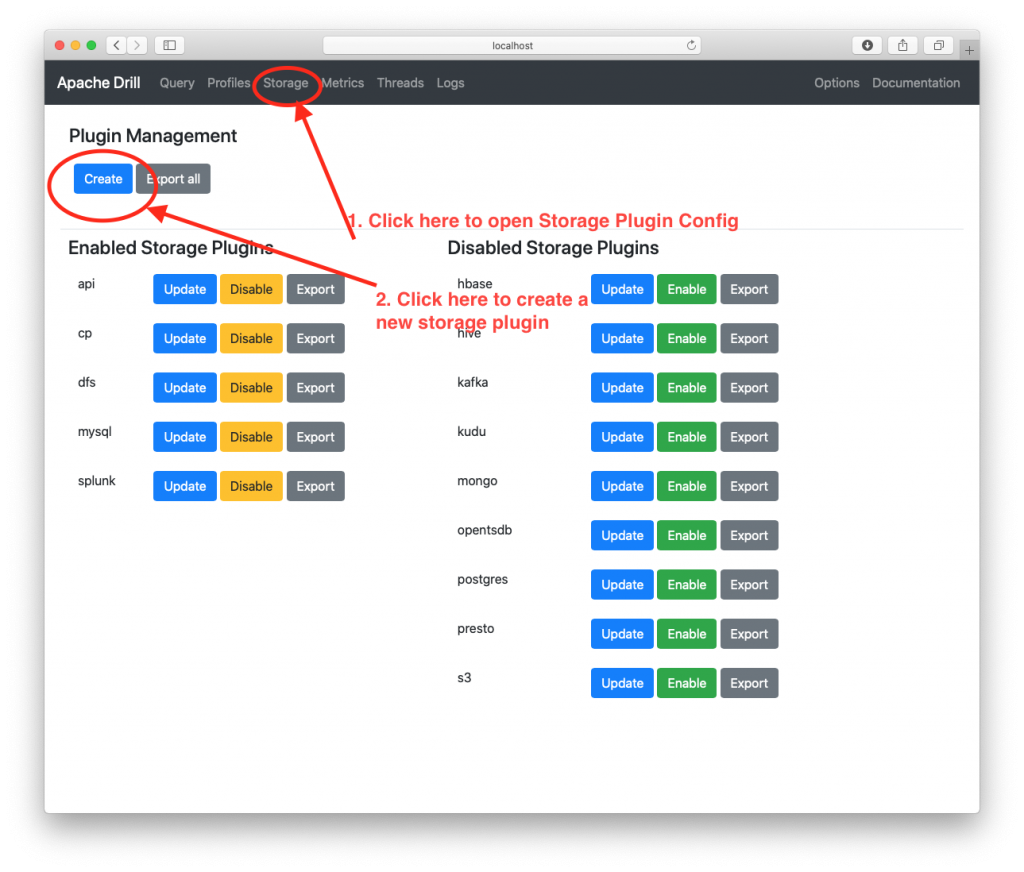
Next, you’ll see a popup with a blank window.
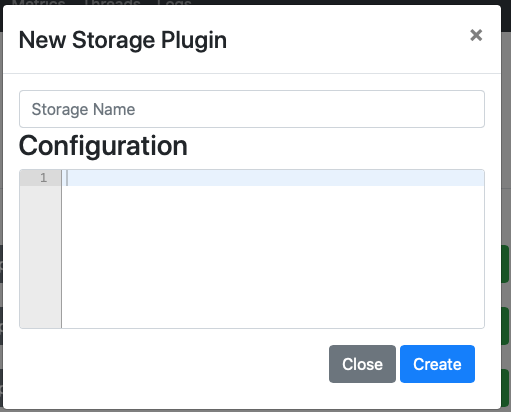
This where you enter the configuration details for your API. In the Storage Name area, give it a name like api, or http or something so that you know what kind of data you are querying. This name is just for your reference, and has no impact on the query execution, but it is the name you will be using in queries.
The snippet below shows you all the global configuration options available in Drill. Most of these should be self-explanatory. (Complete documentation is available here) The only ones which must be set are the type which should be set to “http” and the enabled setting, which should be set to “true”.
{
  "type": "http",
  "cacheResults": false,
  "connections": {},
  "timeout": 0,
  "proxyHost": null,
  "proxyPort": 0,
  "proxyType": null,
  "proxyUsername": null,
  "proxyPassword": null,
  "enabled": true
}
Within the API storage plugin, Drill allows you to define multiple connections. For example, let’s say that you have a weather API and a stock price API. You can define separate connections for each of them so that when you execute queries, you could query each one individually as shown below:
SELECT *
FROM api.stock.`AAPL`

-- or
SELECT *
FROM api.weather.`baltimore`
Configuring the Connection
Next, you have to set up the actual connection. To use the COVID tracking API example shown in the tutorial, simply cut and paste the following snippet inside the curly braces next to connections.
 "covid": {
      "url": "https://covidtracking.com/api/v1/",
      "method": "GET",
      "headers": null,
      "authType": "none",
      "userName": null,
      "password": null,
      "postBody": null,
      "params": null,
      "dataPath": null,
      "requireTail": true
    }
As you can see, most of these parameters can be left empty or blank. The key parameter is the URL parameter which is obviously the URL for the API in question.
The complete config used in the presentation is shown below:
{
  "type": "http",
  "cacheResults": false,
  "connections": {
    "covid": {
      "url": "https://covidtracking.com/api/v1/",
      "method": "GET",
      "headers": null,
      "authType": "none",
      "userName": null,
      "password": null,
      "postBody": null,
      "params": null,
      "dataPath": null,
      "requireTail": true
    }
  },
  "timeout": 0,
  "proxyHost": null,
  "proxyPort": 0,
  "proxyType": "direct",
  "proxyUsername": null,
  "proxyPassword": null,
  "enabled": true
}
The other options in the configuration for the connection enable you to connect to APIs that require authentication, as well as enable various optimizations, but for now, we can leave those null. You can of course read about them in the documentation linked above.
Querying the API
Now that you have the configuration setup, you’re ready to query. The only difference between querying an API an querying a regular database table is the FROM clause. In the example below, you see the base query I used to query the COVID tracker API. In this case, the FROM clause consists of three parts which are separated by dots:
- The storage plugin which in our case should be api or whatever you called your plugin
- The connection name. This is the name of the actual API connection you specified in your config.
- The final component are any tables, or other URL arguments that you need to pass to the API in order to get data. The COVID site actually has several APIs so you can either create separate connections for each, or include it in the FROM clause as shown below. The result is that this text is appended to the URL, so the complete URL which is retrieved is: https://covidtracking.com/api/v1/states/daily.json.
SELECT *
FROM api.covid.`states/daily.json`
Once you’ve done that, you can execute the query and you should get results! I have tested this with simple APIs such as the COVID tracker and very complicated messy APIs such as JIRA and it works really well in all those cases.
Conclusion
In conclusion, this brief tutorial demonstrates how you can query data from a REST API using Drill. When you combine that with a visualization tool such as Superset, you can quickly build out interactive dashboards. As you can see from the tutorial, this took me about 15 minutes from start to finish. I had no engineering support, just a working install of Drill and Superset. If you have any questions, please post in the comments below, or email me.
copy the config to drill, but did not sucess.
with the following error
Please retry: Error (invalid JSON mapping)
It is kind of annoying, because the error message did not provide any useful information.
Hi there,
I suspect the reason you’re getting this error is that you aren’t using the version of Drill which has the REST support. Please try again with this pre-release version here:
https://github.com/cgivre/drill/releases/tag/1.18.0-SNAPSHOT.
The new version works great and thanks for the snapshot release. The rest support deserve a new release.
Glad to hear it! The next release of Drill will have a lot of additional new functionality and will likely be release in June.